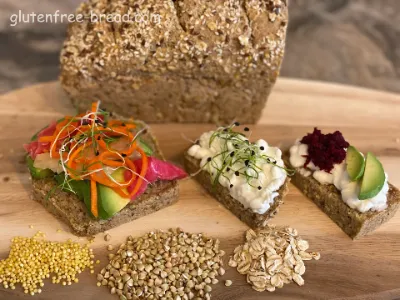
Buckwheat Bread 1 Ingredient

Buckwheat Bread 1 Ingredient
This fermented Buckwheat Bread is made without any wheat, yeast, eggs, sugar, and is completely vegan. The main ingredient buckwheat is a seed, not a grain or wheat at all, so it is appropriate for a gluten-free diet. It is super healthy and nutritious, rich in minerals, fiber and protein. It has a strong earthy flavor so you can enjoy it as it is, toasted or with different bread spread such as hummus, guacamole, butter or pair it with Beetroot Vegan Borscht.
I recommend using metric measurements for exact results.
0 Likes
0 Comments
Login
GF
LC
SF
YF
EF
DF
OF
NF
VG

Gluten Free, Low Carbs, Sugar Free, Yeast Free, Egg Free, Dairy Free, Oil Free, Nut Free, Vegan

GF
Gluten Free
LC
Low Carbs
SF
Sugar Free
DF
Dairy Free
OF
Oil Free
YF
Yeast Free
EF
Egg Free
VG
Vegan
NF
Nut Free

Ingredients:

NameMetricUSTIP
Raw Buckwheat Groats250 gr1 1/4 cups
Water125 ml1/2 cup
Salt3 gr1/2 tsp

Optional Ingredients:

6 gr / 1 tsp Sesame seeds, Sunflower seeds, Hemp seeds, herbs..
6 gr / 1 tsp Sugar ( to speed up fermentation )

Equipment:

Blender
Loaf pan 3 x 6-inch / 7.5cm x 15.5cm

Steps:

  • Buckwheat Bread 1 Ingredient
    Rinse the Buckwheat Groats (250 gr) under cold water. Place them in a bowl and cover with water. Let them soak for at least 4 hours, or overnight.

    Rinse the Buckwheat Groats (250 gr) under cold water. Place them in a bowl and cover with water. Let them soak for at least 4 hours, or overnight.

  • Buckwheat Bread 1 Ingredient
    Drain and rinse the soaked buckwheat groats thoroughly. In a blender, combine the soaked Buckwheat Groats and Water (125 ml), Sugar (if using). Blend until you get a very smooth texture.

    Drain and rinse the soaked buckwheat groats thoroughly. In a blender, combine the soaked Buckwheat Groats and Water (125 ml), Sugar (if using). Blend until you get a very smooth texture.

  • Buckwheat Bread 1 Ingredient
    Pour the batter into a clean bowl, cover and leave it to ferment for 12 to 24 hours. The exact duration can vary based on factors such as ambient temperature and the desired level of fermentation

    Pour the batter into a clean bowl, cover and leave it to ferment for 12 to 24 hours. The exact duration can vary based on factors such as ambient temperature and the desired level of fermentation

  • Buckwheat Bread 1 Ingredient
    Preheat the oven to 395°F (200°C) and line the bread pan with parchment paper. Add Salt and Seeds, mix it (but don't overmix) and pour the fermented buckwheat dough into loaf pan.

    Preheat the oven to 395°F (200°C) and line the bread pan with parchment paper. Add Salt and Seeds, mix it (but don't overmix) and pour the fermented buckwheat dough into loaf pan.

  • Buckwheat Bread 1 Ingredient
    Bake the bread for about 1 hour. Perform the knock test or toothpick test. If your bread needs more baking time based on the knock test, gently remove it from the loaf pan using oven mitts, place the bread directly on the oven rack and bake it 5-10 more minutes.

    Bake the bread for about 1 hour. Perform the knock test or toothpick test. If your bread needs more baking time based on the knock test, gently remove it from the loaf pan using oven mitts, place the bread directly on the oven rack and bake it 5-10 more minutes.

  • Buckwheat Bread 1 Ingredient
    Cool the bread to room temperature before slicing and serving!

    Cool the bread to room temperature before slicing and serving!

  • Buckwheat Bread 1 Ingredient
    A slice of well-fermented buckwheat bread with air bubbles should have a rustic appearance, with a balance between a denser crumb and airy texture. It's a delightful bread option for those looking for a unique flavor profile and wholesome texture.

    A slice of well-fermented buckwheat bread with air bubbles should have a rustic appearance, with a balance between a denser crumb and airy texture. It's a delightful bread option for those looking for a unique flavor profile and wholesome texture.

Comments:

  • Buckwheat Bread 1 Ingredient

    Buckwheat Bread 1 Ingredient

    Performing the knock test is a simple and effective way to check if your bread is fully baked. Here’s how you can do it:

    1. Wait until near the end of the recommended baking time: Typically, this is around 5-10 minutes before the suggested bake time is complete.

    2. Remove the bread from the oven: Use oven mitts to carefully take the bread out of the oven.

    3. Knock on the bottom of the bread: Gently tap the bottom of the loaf with your knuckles or fingertips.

    4. Listen to the sound: A fully baked bread will produce a hollow sound when tapped. This indicates that the interior of the bread is cooked through and the crust is properly caramelized.

    5. Check the color and texture: The crust should be golden brown and firm, and the loaf should feel light for its size.

    If the bread does not sound hollow, place it back in the oven for another 5-10 minutes and then test it again.

    You can remove the bread from the pan and place it directly on the oven rack or a baking sheet when you return it to the oven for additional baking. Here's how you can do it:

    1. Perform the knock test: If your bread needs more baking time based on the knock test, gently remove it from the loaf pan using oven mitts.

    2. Place it back in the oven: Place the bread directly on the oven rack or on a baking sheet lined with parchment paper. This allows the heat to circulate evenly around the bread, ensuring it bakes evenly on all sides.

    3. Continue baking: Return the bread to the oven and bake for the additional time needed, typically 5-10 minutes depending on how much longer it needs to bake.

    4. Check for doneness: Perform the knock test again or use a thermometer to check the internal temperature of the bread (it should be around 190-200°F or 88-93°C for fully baked bread).

    5. Cool the bread: Once fully baked, remove the bread from the oven and let it cool on a wire rack for at least 10-15 minutes before slicing. This allows the bread to set and prevents it from becoming soggy.

    Removing the bread from the loaf pan and placing it directly on the oven rack or baking sheet helps ensure that the bottom crust continues to bake and develop a nice texture without being confined by the pan. Just be cautious when handling hot bread and use oven mitts to avoid burns.

    Performing both the toothpick test and the knock test can provide a more comprehensive assessment of whether your bread is fully baked. Here’s a comparison of both methods:

    Toothpick Test:

    • How to Perform: Insert a clean toothpick or skewer into the center of the bread. Pull it out after a few seconds.
    • What to Look For: If the toothpick comes out clean with no batter sticking to it, the bread is likely done. If it comes out with wet batter or crumbs, it needs more baking.

    Knock Test:

    • How to Perform: Gently tap or knock on the bottom of the bread with your knuckles or fingertips.
    • What to Listen For: A hollow sound indicates that the bread is fully baked and the interior is cooked through.

    Accuracy:

    • Toothpick Test: This test is more reliable for quick and specific feedback on whether the interior of the bread is baked. It directly checks the moisture content inside the bread.

    • Knock Test: While the knock test can give you a good indication of overall doneness and crust texture, it relies on experience and judgment to interpret the sound correctly. It's particularly useful for checking the crust's firmness and caramelization.

    Using Both Tests:

    • It’s a good practice to use both tests together for a more accurate assessment:

      • Start with the toothpick test to check the interior doneness.
      • If the toothpick comes out clean, perform the knock test to confirm the overall bake and crust quality.
    • If there’s any doubt after performing both tests, you can always return the bread to the oven for a few more minutes and check again.

    Both tests complement each other well, offering different insights into the readiness of your bread. The toothpick test gives you precise information about the interior moisture level, while the knock test evaluates the overall baking quality and crust development.

    The fermentation process in bread-making, especially for raw buckwheat bread, is a critical step that involves the interaction of yeast, bacteria, enzymes, and sugars to transform the dough. Here’s a detailed look at the fermentation process and potential challenges:

    Fermentation Process:

    1. Activation of Microorganisms:

      • Yeast and Bacteria: These microorganisms are naturally present in the environment and on the surface of grains like buckwheat. When mixed with water and allowed to ferment, they metabolize sugars (from the buckwheat) into carbon dioxide and ethanol, which leavens the bread and gives it flavor.
    2. Development of Flavor and Texture:

      • Acid Production: During fermentation, lactic acid bacteria produce lactic acid, which contributes to the characteristic tangy flavor of fermented bread.
      • Gas Production: Yeast produces carbon dioxide gas, which gets trapped in the dough, causing it to rise and creating a lighter texture.
    3. Gluten-Free Considerations:

      • Buckwheat is naturally gluten-free, so the fermentation process doesn’t involve gluten development like traditional wheat bread. Instead, it focuses on enhancing flavor and improving digestibility.

    Potential Issues and Solutions:

    1. Under-fermentation:

      • Symptoms: Bread may be dense, lacking in flavor, and have a starchy taste.
      • Causes: Insufficient time for yeast and bacteria to fully ferment the dough.
      • Solution: Allow more time for fermentation, ideally 12-24 hours at room temperature, to develop complex flavors and a lighter texture.
    2. Over-fermentation:

      • Symptoms: Bread can become overly sour or have a strong alcohol smell. It may collapse or become too sticky.
      • Causes: Leaving the dough to ferment for too long or at too warm a temperature, leading to excessive yeast and bacterial activity.
      • Solution: Monitor the dough closely during fermentation and adjust time and temperature accordingly. Refrigerating the dough can slow down fermentation if needed.
    3. Temperature Control:

      • Importance: Fermentation temperature influences the rate of fermentation and flavor development.
      • Ideal Temperature: Around 20-25°C (68-77°F) is generally suitable for bread fermentation. Cooler temperatures slow down fermentation, while warmer temperatures accelerate it.
    4. Hygiene and Contamination:

      • Concerns: Proper sanitation of utensils and containers is crucial to prevent contamination by unwanted bacteria or molds, which can affect fermentation and spoil the dough.
      • Solution: Use clean equipment and maintain a clean workspace to ensure a healthy fermentation environment.
    5. Ingredient Quality:

      • Impact: The quality of buckwheat and water used affects fermentation. Buckwheat should be fresh and free from contaminants.
      • Solution: Use high-quality ingredients and filtered water to ensure optimal fermentation results.

    By understanding the fermentation process and potential challenges, you can better manage the variables to achieve delicious and properly fermented raw buckwheat bread. Adjustments in time, temperature, and ingredient quality can significantly influence the final product’s taste and texture.

Buckwheat Bread 1 Ingredient additional information:

Soaking buckwheat when making bread serves several important purposes that contribute to the quality and texture of the final product:

  1. Softens the Grain: Buckwheat groats are quite hard and can have a slightly bitter taste if not properly prepared. Soaking helps soften the groats, making them easier to blend or grind into flour and resulting in a smoother texture in the final bread.

  2. Removes Enzyme Inhibitors: Buckwheat, like many grains and seeds, contains enzyme inhibitors that can interfere with digestion and nutrient absorption. Soaking helps deactivate these inhibitors, making the nutrients in buckwheat more bioavailable and easier to digest.

  3. Improves Texture: Soaking also helps hydrate the buckwheat groats, which improves their texture in the bread. It allows the flour to absorb moisture more evenly during mixing, resulting in a dough that is easier to work with and shape.

  4. Enhances Flavor: Soaking can also contribute to a more developed and nuanced flavor in the bread. This is especially true for fermented breads where soaking can help initiate fermentation, contributing to a deeper flavor profile.

  5. Reduces Cooking Time (if using whole groats): If you're using whole buckwheat groats in your bread recipe, soaking them beforehand can reduce their cooking time. This ensures that the groats cook evenly and become tender when incorporated into the dough.

In summary, soaking buckwheat before making bread helps improve its texture, flavor, and nutritional benefits. It's a step that enhances the overall quality of the bread and ensures a more enjoyable baking experience.